
Forget what you think you know about starting a blog. The easiest, fastest way to get your words online today isn't through the old, clunky platforms. It's a modern, streamlined approach using a static site generator like Jekyll, hosted for free on GitHub Pages. This combination gives you a blazing-fast, secure, and professional blog for zero cost. It’s the simple, powerful secret behind countless high-performing websites.
Rethinking What Makes Blogging Easy
When most people think "start a blog," their mind immediately goes to the usual routine: sign up for a hosting plan, install WordPress, and then try to figure out a complicated dashboard full of plugins and updates. For years, that was the only game in town.
But what if the easiest path forward means skipping that entire process? What if you could have something faster, more secure, and completely free?
This guide is built on a different idea of what "easy" means. It's not about settling for a slow, bloated platform just because it has a pretty interface. True ease comes from eliminating maintenance headaches, security vulnerabilities, and monthly bills. It means you can focus entirely on your content while an automated, efficient system does all the heavy lifting.
The Modern, Effortless Approach
We're going to build a professional-grade blog without the usual baggage. Here are the three core pieces of the puzzle:
- GitHub Pages: Think of this as incredibly fast, reliable, and free web hosting.
- Jekyll: This is a static site generator. It takes your simple text files and turns them into a complete, secure website made of basic HTML.
- JekyllPad: A simple visual editor that lets you write, edit, and publish posts without ever needing to touch a line of code or deal with complex Git commands.
This setup strips away the technical hurdles that used to gatekeep high-performance websites. You get all the good stuff—speed, security, and the ability to handle tons of traffic—with the simplicity of a point-and-click tool.
The number of blogs has exploded from 70 million in 2005 to over 600 million today, and that growth happens when the barrier to entry gets lower. This method is the next step in that evolution.
This decision tree lays out the two main paths you can take when starting a blog today.
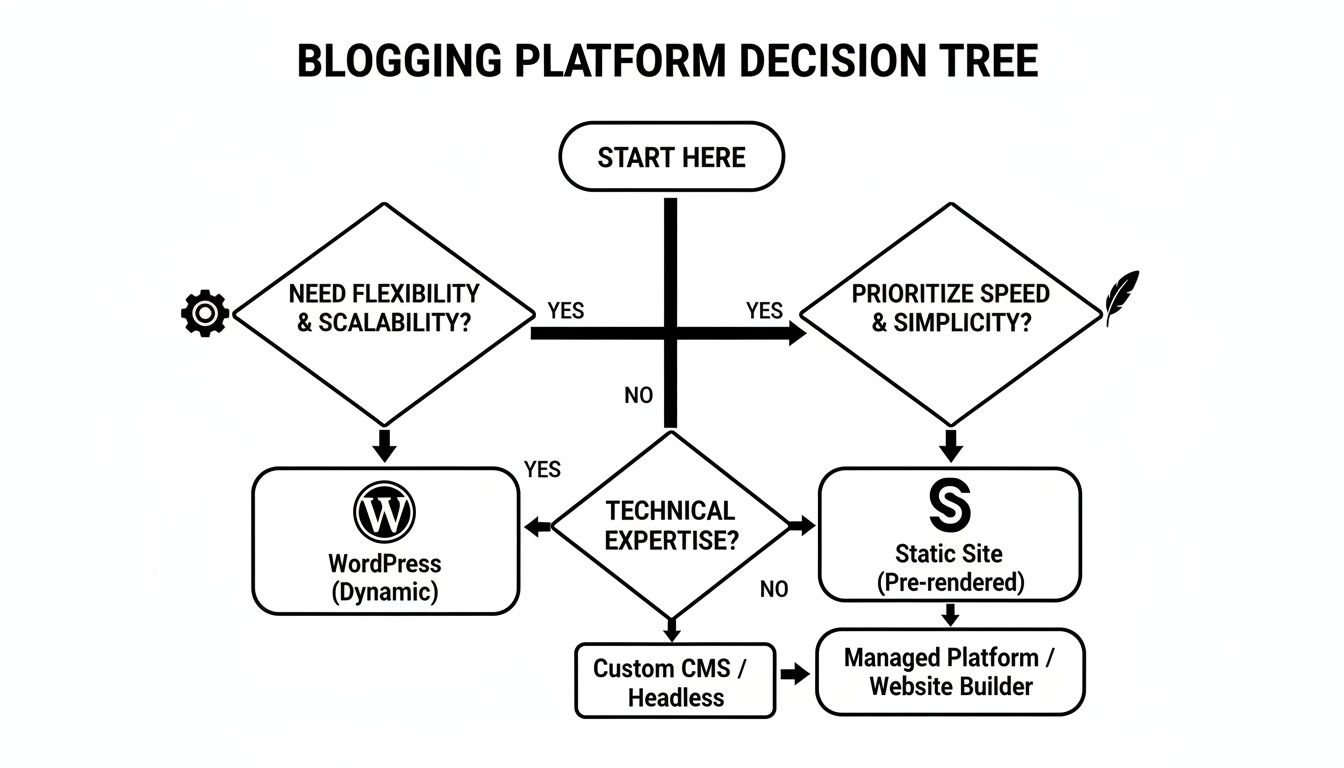
As you can see, while traditional platforms feel familiar, the static site route is a clear winner on performance and cost. If you're on the fence and still asking yourself, "Should I Start a Blog?", this guide will prove just how simple it can be.
Here's a quick table to break down the real-world differences between these two approaches.
Comparing Blogging Paths At a Glance
| Feature | Traditional Method (e.g., WordPress) | Static Site Method (GitHub Pages + JekyllPad) |
|---|---|---|
| Cost | Monthly hosting fees ($5-$30+), premium themes/plugins | 100% Free |
| Speed | Can be slow due to database queries and plugins | Extremely fast; serves simple HTML files |
| Security | Constant updates needed; vulnerable to attacks | Highly secure; no database or server-side code to hack |
| Maintenance | Requires regular updates, backups, and security scans | Zero maintenance required |
| Complexity | Complex dashboard, plugin management, potential for errors | Simple, text-focused workflow with a visual editor |
Ultimately, the static site method gives you a professional outcome without the ongoing work and financial drain. You set it up once and then just focus on writing.
The real challenge in blogging isn't the technology; it's consistency. The easiest way to start is by choosing a system that removes friction and lets you focus entirely on creating content. This modern workflow is designed to do exactly that.
Setting Up Your Free Blog on GitHub Pages
Alright, this is where the magic really happens. Forget about wrestling with server configurations or worrying about monthly hosting bills. We're going to get your blog’s foundation built and live on the web—for free—by tapping into the power of GitHub Pages. This whole process is the secret sauce that makes this the easiest way to start blogging for anyone who values speed and simplicity.
If you've never heard of GitHub, don't sweat it. Think of it as a massive, reliable place to store projects. They offer a fantastic free service called GitHub Pages that can host your blog without asking for a dime. It's a favorite among developers, but we're going to sidestep all the technical stuff and use it in a way that requires zero coding.
Your First Step: Creating a GitHub Account
First things first, you'll need a free account on GitHub.com. The process is no different than signing up for any other online service.
- Head over to GitHub and click the sign-up button.
- Pick a username you like. This will become part of your blog's first web address (like
yourusername.github.io). - Follow the on-screen steps to verify your email, and you're in. No credit card, no free trials, just a genuinely free account.
Once that's done, you're literally minutes away from having a live website. The next step is to create a special "repository," which is just a fancy name for the folder where your blog's files will live.
Creating Your Blog Repository
This part is crucial, but simple. The key is creating a repository with a very specific name. This special naming format is what signals GitHub to turn this folder into a live website for you.
Your repository MUST be named exactly like this: yourusername.github.io
So, if your GitHub username is janedoe, you need to name your repository janedoe.github.io. Getting this right is the single most important part of the setup. This repository now acts as your web server, automatically publishing anything you add to it. For a deeper dive into how this all works, check out our guide on the power of using GitHub Pages for your blog.
Choosing a Theme to Get Started Fast
Now for the fun part: making your blog look good. You don't need an eye for design or any web development skills. GitHub Pages works hand-in-hand with a site-building tool called Jekyll, and there are tons of great-looking, pre-made Jekyll themes you can use instantly.
To get started, just go to the "Settings" tab of the repository you just created. From there, find the "Pages" section in the left-hand menu and pick a theme using their Theme Chooser.
It's a one-click process to apply a professional, mobile-friendly design to your site. You can always change it or upgrade to a more custom theme later, but this gets you off the ground immediately.
With over 600 million blogs out there and 53,000 daily searches for "how to start a blog," it's clear people are looking for a simpler way in. This method is the answer, as it completely removes the technical roadblocks that discourage so many new writers.
Believe it or not, you've just launched your blog. By creating an account, naming a repository, and picking a theme, you now have a live URL on the internet. In the next section, we’ll connect this site to a simple visual editor so you can start writing and publishing without ever touching a line of code.
How to Write and Publish Without Ever Touching Code
Alright, your blog's technical foundation is now live on GitHub Pages. This next part is where the magic happens and what truly makes this the easiest way to start blogging: we're going to use a tool called JekyllPad. From this point forward, you can forget about the command line, Git commands, or any of that technical stuff.
We're effectively bridging the gap between powerful, developer-grade hosting and a simple, intuitive writing experience. The whole point is to let you focus on your words, not a complicated workflow.

Connecting Your Blog to a Visual Editor
Think of JekyllPad as a clean, web-based word processor built specifically for the blog you just created. It hooks directly into your GitHub repository, giving you a visual interface to manage everything without the headache.
Getting it hooked up is dead simple. You just authorize JekyllPad to access your GitHub account, pick the yourusername.github.io repository we set up earlier, and you're in. That’s it. Your blog's content is now ready to edit in a friendly environment.
This connection is the key. Every time you fix a typo, add an image, or publish a new article, JekyllPad handles saving it back to GitHub for you. You get all the benefits of version control without even knowing you're using it.
A Writing Experience You Already Know
The second you open a post in JekyllPad, it just feels right. It’s designed to be as intuitive as writing in Google Docs or Medium, completely removing any friction between your ideas and the published page.
You’re getting a clean, distraction-free writing space. The editor lets you:
- Write and format text visually: Bold, italics, lists, and headings work just like in any word processor. No need to memorize Markdown syntax unless you want to.
- Add images with zero hassle: Just drag and drop an image right into your post. The tool uploads the file and creates the link automatically.
- Manage post settings easily: Change the title, author, or publication date in simple input fields instead of wrestling with that YAML front matter code.
This visual approach is a total game-changer for most writers. If you want to dive deeper into this kind of setup, this guide on using a visual CMS with GitHub Pages explains exactly how this combination empowers creators.
The core idea is simple: a great blog is built on great content, not technical skill. By using a visual editor like JekyllPad, you eliminate the intimidating parts of the process, allowing your creativity to flow without interruption.
From Draft to Published with a Single Click
When your draft is polished and ready to go, publishing is as simple as hitting "Save." Seriously.
JekyllPad takes your work and commits the changes directly to your GitHub repository. In the background, GitHub Pages sees the update and automatically rebuilds and deploys your site, usually within a few seconds.
This instant, automated pipeline is what makes this setup so incredibly powerful. You're using a professional-grade development workflow without having to manage any of the moving parts yourself. The result? A fast, secure, and infinitely scalable blog that you can update from any web browser, on any device.
It's the ultimate combination of power and simplicity—the raw performance of a static site with the effortless content management you'd expect from a traditional platform.
Writing Your First Posts and Core Pages
Alright, the technical heavy lifting is done. Your blog is live, even if it's just a blank slate for now. This is where the real fun begins—filling that slate with your ideas and expertise. Thanks to the visual editor, you can just focus on writing, no coding required.
Don't get hung up on making your first post a masterpiece. Seriously. The goal here is momentum. Get something out there. A great starting point is to answer a common question you hear all the time in your field or to write a simple "how-to" guide.
For example, if you're starting a blog about home cooking, you could kick things off with a post like "My 5 Must-Have Kitchen Gadgets." If you're a freelance designer, maybe something like "3 Simple Rules for Choosing Brand Colors."
Think of this first article as a foundational block. Just keep it simple, helpful, and write like you're explaining it to a friend over coffee.
Build Out Your Essential Pages
Beyond your articles, a couple of standard pages will make your blog feel complete and trustworthy right from the start. You'll use the same visual editor, so it's a breeze. Just focus on getting the basics down.
You absolutely need these two:
- An "About" Page: Who are you? Why did you start this blog? Let people know what they can expect to find here. This is your chance to build a real connection with your readers.
- A "Contact" Page: Give people an easy way to reach you. A simple link to your email or a professional social media profile is perfect. It shows you're a real person and open to engagement.
Nailing these two pages gives your brand-new blog instant structure and credibility.
Pro Tip: Don't underestimate your "About" page—it's often one of the most visited pages on a new blog. Share a quick personal story or the mission behind your site. This is how you turn a first-time visitor into someone who comes back for more.
Make Your Posts Easy on the Eyes
How you present your writing is just as critical as the words themselves. Nobody wants to slog through a huge wall of text. The key is to make your content scannable so people can quickly pull out the value.
Here are a few simple formatting habits to get into:
- Keep paragraphs short and sweet (1-3 sentences is a good rule of thumb).
- Use bold text to make key terms pop and use clear subheadings to guide the reader.
- Organize information with bulleted or numbered lists.
- Drop in an image or two to break up the text and add visual interest.
With over 7.5 million blog posts going live every single day, readable content that delivers value quickly is what wins. It's no surprise that formats like how-to guides (76%) and listicles (54%) are so popular—they're built for clarity. You can apply that same principle to everything you publish. If you want to nerd out on more stats, you can explore the full data on Hostinger.com.
Simple SEO Wins to Grow Your Audience
A blog without readers is just a private journal. But getting your content in front of the right people doesn't mean you need a degree in digital marketing. We're going to skip the complicated jargon and focus on a few high-impact basics you can handle right from your editor, starting on day one.
Think of search engine optimization (SEO) as simply making it easy for Google to understand what your post is about and who it’s for. Nailing this is fundamental to making this the easiest way to start blogging for the long haul, because it builds a foundation for traffic that doesn't rely on you constantly promoting every single post.
Your content's title is your most powerful tool. It has to pull double duty: it needs to grab a human's attention while also signaling its topic to search engines. A title like "My Thoughts on Cooking" is way too vague. But something like "5 Essential Kitchen Tools for Beginner Cooks"? That’s specific, helpful, and packed with words people are actually typing into Google.
Crafting Titles and Descriptions
For every post you publish, you get a chance to write a meta description. That's the short snippet of text that appears right under your title in the search results, and it's your 155-character sales pitch to get someone to click.
Don't just rehash the title. Use this space to give a preview of the value you're offering.
- Kick it off with a verb: Start with words like "Learn," "Discover," or "Find."
- Promise a benefit: What will the reader walk away with?
- Include your main keyword: Weave your primary topic in naturally.
Let's say your post is titled "A Guide to Minimalist Travel Packing." A weak description would be a simple summary. A strong one would be: "Learn how to pack light for any trip with our minimalist travel guide. Discover practical tips to fit everything you need into a single carry-on and avoid baggage fees." See the difference? It’s far more compelling.
A well-crafted title and description are your digital storefront window. They are the first impression a potential reader has, and your best chance to convince them that your content is worth their time.
Structuring Content for Readability and SEO
Once someone clicks through, the structure of your post is what keeps them on the page. Use subheadings (like the H2s and H3s in this guide) to break your content into logical, scannable chunks. This isn't just for your human readers; it gives search engines clear signposts about your article’s main points.
Likewise, every image you add needs descriptive alt text. Instead of a generic filename like IMG_1234.jpg, write a clear, concise description: "A close-up of a neatly packed carry-on suitcase." This is crucial for screen readers and accessibility, and it gives search engines even more context about your content. For those of us running static sites, there are plenty of straightforward techniques you can use to master SEO for static websites.
And don't forget that your blog is just one piece of the puzzle. Learning how to repurpose content for social media can dramatically amplify your reach. You can turn a single blog post into a series of tweets, an infographic, or even a short video. This creates multiple new pathways for your audience to find you, multiplying the value of every article you write and pulling in readers from well beyond a simple Google search.
Alright, you've put in the work and your blog is on the brink of going live. Before you shout it from the rooftops, let's run through a quick pre-flight check. This isn't about chasing perfection; it's about making sure your first visitors have a great experience.
Think of this moment as the starting line, not the finish. You've built a solid, fast, and secure foundation—now the real fun begins.
The Final Once-Over
Go through these items one last time. It’s the digital version of checking your teeth in the mirror before you leave the house.
- Core Pages Check: Give your "About" and "Contact" pages a final read. Do they sound like you? Any sneaky typos?
- Link Sanity Check: Click every single link. Your navigation menu, links in your bio, links inside your posts. Make sure nothing is broken.
- First Post Polish: Reread your first article. Does the headline spark curiosity? Is it easy to read, with plenty of white space?
This quick quality check only takes a few minutes, but it makes a world of difference in how professional your new blog feels right out of the gate.
Remember, a blog is a living thing, not a static monument. The bloggers who succeed are the ones who get started, listen to feedback, and keep tweaking. Don't let the "perfect" be the enemy of the "done."
Life After Launch: What Now?
Congratulations, you're live! The beauty of this lightweight setup is that the maintenance is just as simple. Your focus now gets to shift from building to creating and connecting.
The name of the game is consistency. You don't have to publish an article every single day. Just set a schedule you can actually stick to, like one new post every Tuesday. This builds momentum for you and gives readers a reason to come back. I find it helpful to just scribble future post ideas in a simple notebook or a spreadsheet.
Now, go share it! Hitting "publish" is only half the battle. Send the link to a few trusted friends for their thoughts. Post it on your LinkedIn or Twitter. If you're part of an online community that would find it useful, share it there. Getting those first few eyeballs on your work is a huge motivator.
Best of all, you can pretty much forget about technical upkeep. While other platforms need constant plugin updates and security patches, your site just hums along. Your main job now is simple: keep writing.
Ready to manage your new blog with a simple, visual editor and skip the code entirely? JekyllPad gives you an intuitive writing experience with seamless GitHub integration. Start for free and focus on your content today.