
At its core, a robots.txt file is just a simple text file you place in the root folder of your website. Inside, you use straightforward commands like User-agent and Disallow to give search engine bots instructions on which parts of your site they can and can't visit.
Why Your Static Site Needs a Robots.txt File

In a web swarming with automated bots, a robots.txt file has become an essential tool, not just a nice-to-have SEO suggestion. This is especially true if you're running a lean static site on a framework like Jekyll, Hugo, Astro, or Eleventy. It's your first line of defense in managing web traffic.
The biggest job of this small but powerful file is to manage your crawl budget. Search engines only dedicate a certain amount of time and resources to crawling your site. By using robots.txt to block off unimportant areas—think draft folders, admin pages, or asset directories—you can point bots directly toward your most valuable content. This helps ensure your key pages get indexed quickly and efficiently.
Managing a Bot-Driven Web
Gaining this control is more important than ever. The robots.txt file, which dates back to 1994, has become a pillar of web crawling management. With the explosion of AI-driven crawlers, its relevance has skyrocketed. In fact, bots now make up a staggering 52% of all global web traffic, and that number can be even higher on certain hosting platforms.
For anyone running a static site, this has some very real consequences:
- Resource Protection: Unchecked bots can hammer your server, slowing down your site for actual human visitors.
- Content Scraping: A well-written file can help discourage low-quality bots from scraping your hard-earned content.
- SEO Health: Guiding bots ensures search engines see the best, most polished version of your site, which is a core tenet of good SEO for static websites.
By proactively managing crawlers, you protect your site's speed, safeguard your content, and build a stronger foundation for your SEO. It's a must for developers and creators who need a simple, hands-off way to manage bot behavior.
Ultimately, the goal of a robots.txt file is to improve your website crawlability, making sure search engines can discover and index your important content without getting bogged down. Tools like JekyllPad streamline this entire process, letting you create and commit these rules directly to your GitHub repository—no command line needed.
Understanding the Foundational Rules of Robots.txt

Before jumping into creating your robots.txt file, it’s crucial to get a handle on the simple commands that make it tick. Think of it as leaving a note for search engine bots, laying out the ground rules for their visit. The entire file is just a series of rules, each pairing a User-agent (who the rule is for) with directives like Disallow or Allow (what they can or can’t access).
The syntax might look basic, but don't underestimate its power. One misplaced character could inadvertently tell Google to ignore your entire website.
The Core Directives Explained
The whole file revolves around just a few key commands. Once you understand these, you'll be able to confidently write rules for any static site, whether you're using Jekyll, Hugo, or Astro.
- User-agent: This is how you specify which web crawler a rule applies to. You can be specific (e.g.,
Googlebot) or use a wildcard (*) to create a rule for all bots. - Disallow: This command tells the bot not to crawl a certain URL path. Remember, everything after the
/is relative to your main domain. - Allow: While used less often, the
Allowdirective is a lifesaver. It lets you grant access to a specific file or subfolder that’s inside a directory you’ve already disallowed. - Sitemap: This line is a friendly signpost for crawlers, pointing them directly to your XML sitemap. It’s a great way to help them find all the pages you actually want them to index.
Let’s say you’re working on a Hugo project. You probably don’t want search engines crawling your theme’s asset folders. A simple rule like Disallow: /themes/ gets the job done. For a Jekyll site, you might want to block a folder of unpublished drafts with Disallow: /drafts/.
A great starting point for any new
robots.txtfile is to allow all crawlers full access while providing a link to your sitemap. This gives you maximum visibility right away, and you can always add more restrictive rules later.
Using Wildcards for Broader Control
This is where you can get a bit more sophisticated. Wildcards, especially the asterisk (*), are incredibly handy for creating flexible rules without writing dozens of lines.
The * has two main jobs in a robots.txt file. First, when you set User-agent: *, you're creating a universal rule that applies to every bot that comes to your site. It’s the perfect way to set your baseline instructions.
Second, you can use wildcards inside a Disallow or Allow path to match patterns. For instance, if you wanted to block search bots from crawling any and all PDF files on your site, you could use this rule: Disallow: /*.pdf$. The $ character is important here—it signals the end of the URL, ensuring the rule only applies to URLs ending with .pdf.
Using wildcards strategically keeps your robots.txt file clean, concise, and much easier to manage as your website grows.
Generating Your Robots.txt File with JekyllPad

Alright, enough with the theory. Let's get our hands dirty and actually build this thing. I’m going to show you how to generate your robots.txt file without ever touching the command line or cloning a repository. The whole point is to manage your site’s crawl rules quickly and efficiently, right from your browser.
We'll be using JekyllPad for this, which ties directly into your GitHub repository. It essentially transforms a technical chore into a simple content update, which is a massive time-saver for anyone managing a static site.
Creating and Editing Your File
First things first, you need the robots.txt file itself. It has to live in the root directory of your project—nowhere else. Search engines are programmed to look for it at your-domain.com/robots.txt, and if it's not there, they'll assume you don't have one.
If you don't have one yet, just create a new file named exactly robots.txt using the file manager.
Once you have the file open, you can start laying down your directives. The editor gives you a clean space to type out your User-agent, Disallow, Allow, and Sitemap rules.
For a brand-new static site, I almost always start with this simple, open configuration:
User-agent: * Disallow:
Sitemap: https://your-domain.com/sitemap.xml This little snippet does two things: it tells every bot out there that they're welcome to crawl everything, and it points them to your sitemap for an easy roadmap. It’s the best way to ensure full crawl coverage right from the get-go.
A Practical Example Scenario
Let's walk through a real-world case. Imagine you've got a documentation site built with Hugo and hosted on GitHub Pages. You've got a folder called /temp-assets/ with some staging files you're not ready to show the world. You also have a draft article at /guides/upcoming-feature.html that you definitely don't want indexed yet.
Here’s how you’d write the rules to handle that:
- Block the temp folder:
Disallow: /temp-assets/ - Block that one draft page:
Disallow: /guides/upcoming-feature.html - Let Googlebot access everything else: This is actually the default behavior, so you don't need a specific
Allowrule for it. Simple.
This is exactly what the process looks like inside the JekyllPad interface. Notice how clean it is—each rule on its own line, which helps you avoid the common syntax errors that can trip people up.
The real magic here is the immediacy. Instead of editing locally, pushing to a staging branch, and then deploying, you can make a change and commit it in a single click. This is incredibly handy when you need to quickly block a rogue scraper or update a sitemap URL on the fly.
Committing and Deploying Your Changes
Once your rules look good, it’s time to commit. This is where the direct GitHub integration really pays off. All you need to do is write a clear, concise commit message—something like "Create robots.txt to disallow temp folder"—and hit save.
That's it. This action commits the robots.txt file straight to your repository's main branch. If you're using a modern host like GitHub Pages, Netlify, or Vercel, this commit will automatically kick off a new build. Within a minute or two, your updated robots.txt is live, giving crawlers their new marching orders.
Advanced Strategies for Staging and Production Environments
A one-size-fits-all robots.txt just doesn't cut it, especially when you're juggling a live site and a development or staging environment. One of the most common missteps I see is letting a staging site run wild with the same permissive rules as the production version. This is a recipe for disaster, as it invites search engines to index your unfinished, unpolished content. Trust me, it's an SEO headache you don't want.
The solution is to create a robots.txt file that's smart enough to know where it is.
For any staging, preview, or development site, your objective is crystal clear: block everything. You absolutely don't want Google finding test pages, broken layouts, or half-baked blog posts. A completely restrictive robots.txt is the right tool for the job.
The best
robots.txtfor a staging site is a digital "Keep Out" sign for every bot on the internet. It prevents duplicate content problems and keeps your work-in-progress private until you're ready for the big reveal.
Creating this universal block is incredibly simple. All it takes is two lines:
User-agent: * Disallow: /
This tiny snippet tells every web crawler that no part of the site is open for business. It’s the most direct and effective way to guarantee your staging URL stays off the search engine radar.
Putting Environment-Specific Rules into Practice
This is where modern static site generators like Astro and Eleventy really shine. Instead of manually swapping out robots.txt files (which is tedious and prone to error), you can automate the whole process using environment variables during your build.
A common approach is to keep separate template files, maybe a robots-staging.txt and a robots-production.txt.
Your build script can then check an environment variable (like NODE_ENV) and simply copy the correct file into your final output directory, renaming it to robots.txt. This way, your staging site automatically gets the restrictive version, while your production site—perhaps deployed through a streamlined service like GitHub Pages—gets the version designed for public crawling. For more on getting your production site live, check out our deep-dive on how to use GitHub Pages with your static site generator.
Here's a quick look at how the rules differ in practice.
Robots.txt Rules for Staging vs Production
It's crucial to understand the different goals for each environment. Staging is about privacy and preventing indexing, while production is about guiding crawlers to your best content.
| Directive Purpose | Staging Environment Example | Production Environment Example |
|---|---|---|
| Global Access | Block all bots from all content to prevent indexing. | Allow all bots to access the site by default. |
| Admin & Scripts | (Not needed, as everything is blocked) | Block crawlers from accessing admin areas or script folders. |
| Sitemap Location | (Not needed, as no pages should be crawled) | Point crawlers to the XML sitemap for easy content discovery. |
This clear separation ensures your development work stays private and your live site is perfectly optimized for search engines from day one.
Handling Aggressive Bots and AI Crawlers
Your production robots.txt can do more than just block off certain directories. You can also add more nuanced rules to manage how specific bots interact with your site. Some crawlers are just plain aggressive, hammering your server with requests and eating up resources without offering much in return.
This is where a directive like Crawl-delay can be a lifesaver.
Crawl-delay: This tells a bot how many seconds it should wait between page requests. Setting a value likeCrawl-delay: 5can effectively throttle crawlers that are too eager.
This has become particularly relevant with the explosion of AI bots. In some shared hosting environments, traffic from AI crawlers like OpenAI's GPTBot has reportedly skyrocketed by a staggering 305%, making up a huge chunk of all bot traffic. According to recent SEO findings from httparchive.org, managing this traffic is becoming a priority. A well-configured robots.txt can help you filter out this noise, saving your server's bandwidth for actual human visitors.
To target AI crawlers specifically, you can add rules for their unique user agents. For example, if you wanted to block GPTBot, you’d just add this block:
User-agent: GPTBot Disallow: /
This gives you fine-grained control over who crawls your site and how often they do it, protecting both your SEO performance and your server's health.
Common Mistakes and How to Test Your File
It’s a hard lesson to learn, but a broken robots.txt file can do more harm to your SEO than having no file at all. A simple typo can make your rules invisible to crawlers or, in a worst-case scenario, accidentally tell every search engine to ignore your entire website. The good news is that these mistakes are usually easy to spot and fix once you know what to look for.
One of the most common blunders I see is getting too heavy-handed with the Disallow directive. People often block their /assets/ or /themes/ folders, thinking they're just filled with unimportant code. But here's the thing: modern search engines like Google need to see your CSS and JavaScript files to render your pages correctly. If they can't access those resources, they see a broken, text-only version of your site, which can absolutely tank your rankings.
Avoiding Common Configuration Errors
Another classic mistake is putting the robots.txt file in the wrong place. It must be in the root directory of your site. That's yourdomain.com/robots.txt, and nowhere else. Search bots are hard-coded to look in that one specific location. If your file is tucked away in a subdirectory, they simply won't find it and will proceed as if you have no rules at all.
And please, never, ever use robots.txt to hide sensitive information. It’s a publicly accessible file that anyone can read. It acts as a polite suggestion for well-behaved crawlers like Googlebot, but it does absolutely nothing to stop a malicious bot from scraping your site. Think of it as a "Please Keep Off the Grass" sign, not a high-security fence.
Key Takeaway:
robots.txtmanages crawling, not indexing. If you absolutely need a page kept out of search results, you must use anoindexmeta tag in that page's HTML. The two work hand-in-hand.
Validating Your File with Testing Tools
Before you push any robots.txt changes live, you have to test them. The go-to tool for this is Google Search Console's robots.txt Tester. It’s free, and it’s from the source. You can paste your code in, test specific URLs, and see instantly whether Googlebot is allowed to crawl them. It’s a lifesaver for catching syntax errors or rules that don't behave as you expect.
For a broader health check, using some of the best tools for SEO analysis can reveal crawlability problems you might have missed. A full site audit can often flag issues rooted in a misconfigured robots.txt that aren't immediately obvious.
It's also worth noting how AI scraping is changing the game. While a 2025 Duke University study pointed out that many AI crawlers simply ignore robots.txt, the file remains essential for managing major search engines. Being too restrictive might even block your content from appearing in AI-powered search results, which is quickly becoming a major traffic source.
The image below gives a perfect side-by-side look at how your robots.txt should differ between a staging site and your live, production site.
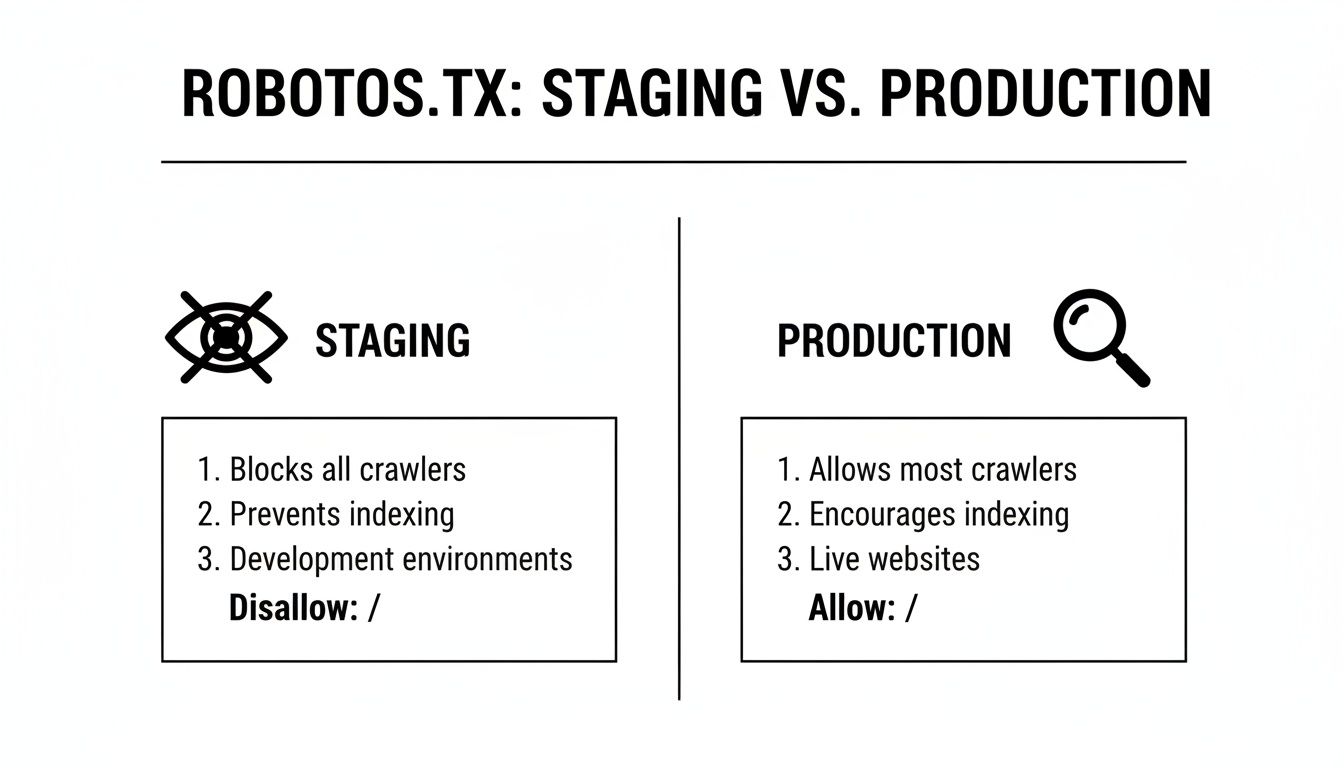
It really boils down to a simple principle: you want to block all crawlers from your staging site to prevent unfinished content from being indexed, while your production site needs to be open for business.
Got Questions? Let's Talk Robots.txt
Even with the best tools, you're bound to run into a few head-scratchers when managing a robots.txt file. I've seen these same questions come up time and time again, so let's clear the air on some of the most common ones for static sites.
Can I Block Specific AI Bots Like ChatGPT?
You bet. Most of the major AI crawlers have their own unique calling card, a specific user-agent string you can target. To put up a stop sign for OpenAI's GPTBot, for example, you'd just add these lines to your file:
User-agent: GPTBot
Disallow: /
But hold on—this is a strategic decision, not just a technical one. Blocking these bots means your content might not show up in AI-driven answers or future search experiences. You gain control over your content, but you might lose out on visibility in new places. It's a classic trade-off.
Before you block every AI crawler, think about the long game. You're preventing scraping, sure, but you could also be cutting yourself off from a future source of valuable traffic.
If I Disallow a Page, Is It Guaranteed to Stay Out of Google?
Nope. This is probably the biggest misconception about robots.txt. A Disallow directive is a polite suggestion, not an unbreakable command. Good bots like Googlebot will respect it, but here's the catch: if another website links to your disallowed page, Google can still find it and index the URL.
When that happens, your page might pop up in search results with that unhelpful "No information is available for this page" message. Not a great look.
If you absolutely, positively need a page to stay out of search results, the only surefire way is to use the noindex meta tag in the page's HTML <head>. For total peace of mind, use both:
Disallowinrobots.txt: This tells bots not to waste crawl budget on the page.noindexmeta tag: This is the direct order to search engines: "Do not include this in your index. Period."
This two-part strategy is the professional standard. It's efficient and effective.
Do I Need a Different Robots.txt for Each Subdomain?
Yes, absolutely. A robots.txt file only works for the exact host (domain or subdomain) it lives on. The rules you set at www.example.com/robots.txt have zero effect on what happens over at blog.example.com.
Search engines see each subdomain as a completely separate website. So if you're running a blog, a docs site, and a marketing site on different subdomains, each one needs its own robots.txt file right at its root (e.g., blog.example.com/robots.txt, docs.example.com/robots.txt, etc.). Each file should have rules specifically for the content on that subdomain.
Ready to stop wrestling with text files and command-line tools? JekyllPad gives you a simple, browser-based editor to create, manage, and commit your robots.txt directly to your GitHub repo. Get started for free at https://www.jekyllpad.com.